Using VBA to Hide Rows in Excel
Over the next few minutes, I will show you two techniques for automatically hiding and showing rows in Excel using VBA code. These techniques I use regularly in my real estate financial models to make for a more intuitive user experience.
In the past, I’ve created similar tutorials for hiding worksheets or creating dynamic buttons and toggles. And in fact, this logic can be used in tandem with those techniques to really improve the usability of an Excel model.
To teach this concept, I’ve recorded a short 10 minute video, attached a completed file, and included a link to the VBA I use. I’ve also written out the basic steps for you to follow.
These simple techniques help make complex models easier to navigate and use.
Download the VBA Code and Completed Workbook
To get you started, below find links to download the VBA code and completed file used in the video tutorial.
- Click here to download the basic VBA code used in this tutorial
- Click here to download the basic Excel file created in this tutorial
Video Tutorial – Using VBA to Hide Rows in Real Estate Excel Models
The following 10 minute video will walk you through the process of using VBA to hide and show rows in your real estate Excel models. My recommendation is to open an open Excel workbook and follow along as I teach the techniques. Refer to the written instructions below and be sure to have downloaded the VBA code and completed file above to help you.
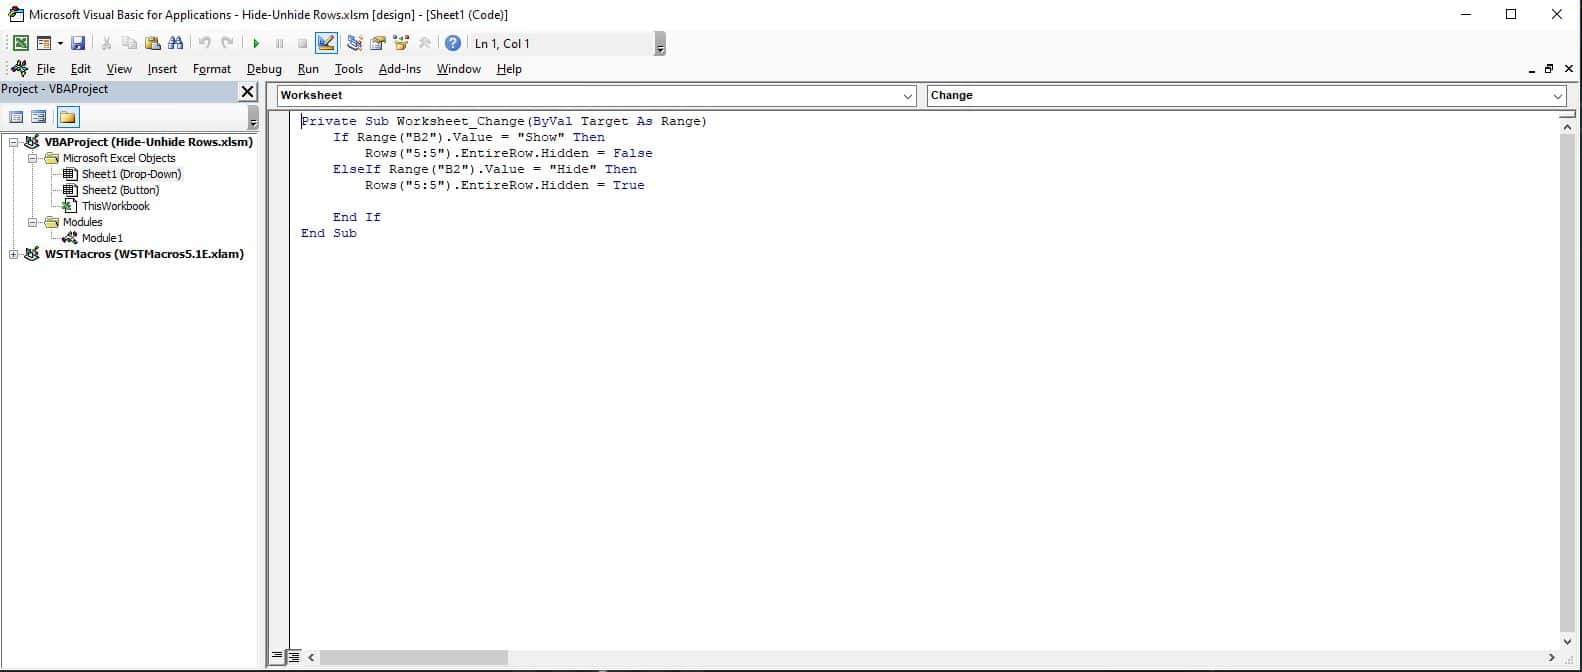
Technique #1 – Using a Drop-Down Menu to Hide or Show Rows
The first technique in the video involves using drop-down menus to hide or show rows. This is a really simple and intuitive method, but it’s not without its drawbacks.
The downside to this technique is that the code runs each time a change is made to the worksheet where the code is included. This can dramatically slow down a Workbook. Here are the basic steps for using technique #1.
- Be sure the file is saved as a ‘Macro-enabled Workbook’
- Create a drop-down menu
- Right-click on the tab for the worksheet containing the drop-down menu and select ‘View Code’
- This will open code specific to the selected worksheet
- Enter VBA (download code above) logic that shows or hides defined rows based on the value in the drop-down menu cell
Technique #2 – Using a Buttons to Hide or Show Rows
The second technique in the video involves using buttons to hide or show rows. This is my preferred technique, as the code only runs when a button is pressed. It however takes an additional step or two to build and does not integrate as efficiently into the Worksheet as in-cell drop-down menus do.
- Be sure the file is saved as a ‘Macro-enabled Workbook’
- Insert two shapes and enter ‘Hide’ in one shape and ‘Show’ in the other
- Go to the Developer ribbon and select ‘Visual Basic’ (Don’t see the Developer ribbon?)
- A Visual Basic window will appear, go to Insert>Modules
- A new module with be created with a blank
- Create two Macros (download code above), one to hide a row and the second to show a row
- Close the VBA window and right-click on the shape entitled ‘Hide’; select ‘Assign Macro’ and choose the ‘Hide’ Macro
- Right-click on the shape entitled ‘Show’; select ‘Assign Macro’ and choose the ‘Show’ Macro
Frequently Asked Questions about Using VBA to Hide Rows in Excel
What are the two VBA techniques shown for hiding and showing rows?
The tutorial demonstrates two techniques: (1) using a drop-down menu to control row visibility, and (2) using buttons (shapes with assigned macros) to hide or show rows.
How does the drop-down menu method work?
You create a drop-down menu and write worksheet-specific VBA that responds to the cell value change by hiding or showing defined rows accordingly.
What is a drawback of the drop-down menu technique?
The code runs every time a change is made on the worksheet, which can significantly slow down performance.
Why is the button method preferred by the author?
It only triggers the VBA when a button is pressed, improving performance and minimizing unnecessary processing.
What are the basic steps for setting up the button technique?
Steps include: inserting shapes, writing separate hide/show macros in a new module, and assigning each macro to its respective shape using the ‘Assign Macro’ function.
What type of Excel file must be used for these techniques?
The workbook must be saved as a “Macro-enabled Workbook” (.xlsm).
Can these VBA techniques be combined with other usability features?
Yes. The VBA logic can be integrated with other features like dynamic buttons and toggles to further enhance user experience.
Where can I find the VBA code and example workbook?
Download links for the basic VBA code and the completed Excel workbook are included in the original blog post.
Who created the tutorial and tools?
The tutorial was created by Spencer Burton, Co-Founder and CEO of CRE Agents, with over 20 years of CRE experience and more than $30 billion in underwriting experience.


