How to Create Dynamic, In-Cell Buttons and Toggles in Microsoft Excel
Creating intuitive, user-friendly, visually appealing models is one aspect of mastering real estate financial modeling. One way to make your models easy for people to use and more attractive in general is to use dynamic, theme-appropriate, in-cell buttons (ie. a button that changes text, font, background based on certain logic) and toggles (i.e. buttons to select between two or more options).
In this tutorial, I show you a simple way to create these types of buttons and toggles in Excel. I’ve recorded a video, written a step-by-step guide, and posted two Excel Workbooks used in the video tutorial (a completed Workbook and a blank Workbook with formatting in place).
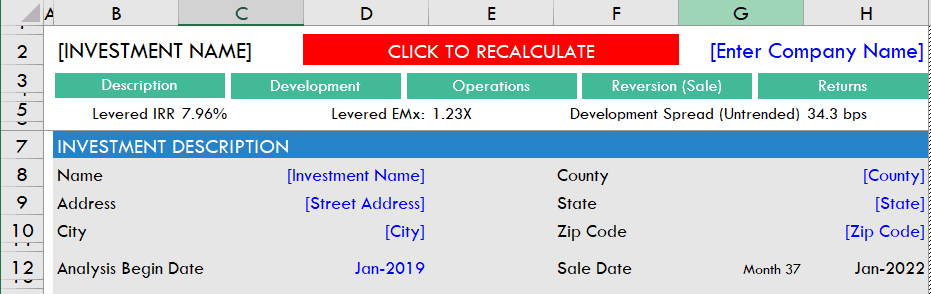
This “Click to Recalculate” button found in one of my apartment development models only appears when the model needs to recalculate. I use dynamic buttons such as this to make for a more intuitive, user-friendly experience.
Step-by-Step Guide to Creating a Dynamic Button and Toggle
In this guide, I add a hypothetical multifamily module to a real estate model. When the multifamily module is activated, an MF Development CF tab and an MF Operating CF tab appear. When the multifamily module is turned off, those same tabs disappear. While you may not intend to replicate this exact scenario in your situation, the basics steps used in this tutorial can be applied to any project.
You might also check out one of our multifamily real estate Excel models.
Step 1 – Set up the multifamily module tabs
This is already done in the blank template attached below, but the first step is to create the two multifamily tabs that will be the crux of the multifamily module. Simply hover over the existing tab at the bottom of the window, right-click, select ‘Insert…’, and then rename the tab ‘MF Development CF’. Do this a second time, only renaming the cell ‘MF Operating CF’.
When the module is on, these two cells will be visible. When it is off, they will be hidden.
Step 2 – Assign a cell to track whether the multifamily module is on or off
The second step is to set one cell aside to track whether the multifamily module is on or off. This cell will be a ‘Named Cell’ (see how to create named cells and ranges), and the value within this cell (either 0 or 1) will be changed by Macros that will be written to turn the multifamily module on and off.
To do this, I first choose a cell. In this case, I’ll choose cell A7. I then name cell A7 to be ‘MF_Module_On?’ by going to the A7 cell name box in the upper left-hand corner of the Excel window and changing A7 to MF_Module_On?. With the cell assigned to this task, I simply enter 1 into that cell to denote that the module is on.
The idea is that, when the cell contains a 0, the module is off while when the cell contains a 1, the module is on.
Step 3 – Write two macros, one that turns the multifamily module on and one that turns it off
The next step is to write or record two macros. The first macro – MF_Module_Off – will turn the multifamily module off by first, changing the value in the MF_Module_On? cell to 0 and then hiding the two MF tabs. The second macro – MF_Module_On – first changes the value in the MF_Module_On? cell to 1, and then unhides the two MF tabs.
The video tutorial shows you in more detail how to record these macros in Excel.
Step 4 – Create the ‘Turn Off’ button
With the MF_Module_On? cell in place and the two macros written, we’ll now create our dynamic, in-cell button. To do this, first select which cell will contain the button. I’ll use cell H4.
In cell H4, I enter the following logic: =IF(MF_Module_On? = 1, “Turn Off”, “”). What this logic says, is if the value in the MF_Module_On? cell is equal to 1 (i.e. the module is currently on), then have cell H4 output “Turn Off”, otherwise leave the cell blank.
With the above logic written, I now need to add conditional formatting that will turn the cell background red with white font when the module is on. To do this, I go to ‘Home>Conditional Formatting>New Rule>Use a Formula to determine which cells to format’. I click the ‘Format values where this formula is true:’ box and enter =MF_Module_ON? = 1. I then, click the ‘Format’ box and select a red background with a white font. After clicking ‘OK’, the cell will now be set to turn red with white font when the multifamily module is on.
With the conditional formatting in place, it’s time to add the button. Go to ‘Insert>Shapes>Rectangle’ and draw a rectangle exactly the same size and within the exact area of the cell H4. Then, with the newly added rectangle selected, change the rectangle’s background color and outline color to ‘No Outline’.
Finally, select the now invisible rectangle, right-click, and select ‘Assign Macro’. Choose the macro you wrote to turn off the multifamily module – in my case the macro is called MF_Module_Off.
Fun Fact: I use the In-cell button technique in my All-in-One model. Go download the model, head to the S&U tab (the tab only becomes visible with the Development module active), and change the assumed LTC. You’ll see a box appear asking you to recalculate the construction interest.
When the multifamily module is on, the button should be red with the words “Turn Off”. You should be able to click it, which will consequently hide the MF tabs and the button will disappear.
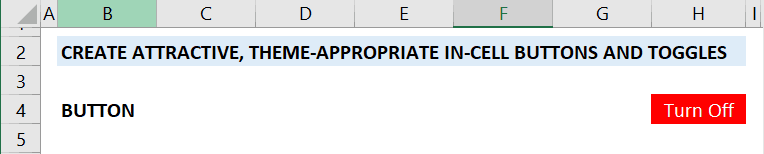
This dynamic, in-cell button is visible when the multifamily module is on. Clicking the button turns the module off, and the button disappears.
Step 5 – Create the On/Off Toggle
Steps to creating the toggle are substantially similar to creating the button, only there will be two buttons. One button turns the multifamily module on, and the other button turns the multifamily module off. It is a toggle, because the conditional formatting logic is such that the background color and font color change in each cell depending on whether the module is on or off.
First select which two adjacent cells will contain the ‘On’ and ‘Off’ toggles. I’ll use cell G7 for ‘Off’ and H7 for ‘On’. Type “Off” in cell G7 and “On” in cell H7. Next, change the base formatting for both cells to a dark background with light font. In this case, I’ll use a dark green background with a white font.
With “Off” and “On” written in the cells and the cells both having a dark green background with white font, it’s time to use conditional formatting to change the color of the cells depending on whether the multifamily module is on or off. If the module is on, I’ll set the ‘Off’ cell to a white background, with dark green border and grey font. Likewise, if the module is off, I’ll set the ‘On’ cell to have a white background, with dark green border and grey font.
This is done by selecting each cell individually, going through the conditional formatting process explained in Step 4 above, and using logic such as =MF_Module_On? =1 for the ‘Off’ cell and =MF_Module_On? =0 for the ‘On’ cell. If done correctly, you can manually change the value in the MF_Module_On? named cell and the ‘On’ and ‘Off’ cells will toggle from dark background to light background depending on whether the module is on or off.
Finally, using the same process employed in Step 4, add invisible rectangles into each cell and assign each a macro. Assign the multifamily module off macro to the ‘Off’ box/cell and the multifamily module on macro to the ‘On’ box/cell.
Step 6 – Verify that the Buttons and Toggles Work
Once you’ve finished Steps 1 through 5, click the button and toggles to verify that they are working correctly. When the module is on, the ‘Turn Off’ button should be red, the ‘Off’ toggle should have a light background while the ‘On’ toggle should have a dark background. When the module is off, the ‘Turn Off’ button should be hidden, the ‘Off’ toggle should have a dark background while the ‘On’ toggle should have a light background.
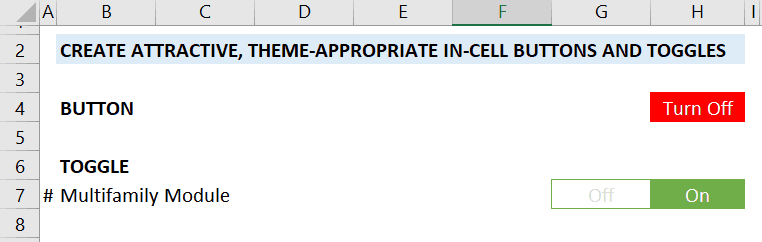
Use a dynamic, in-cell toggle to illustrate two selection options.
Video Tutorial on How to Create a Dynamic Button and Toggle in Excel
Below find a screenshare video I created showing you how to create a dynamic, in-cell button and toggle. I recommend you download the accompanying Excel Workbooks – one is a completed file while the second is a blank Workbook with the formatting and MF tabs added for you. Use the blank Workbook to follow along with the tutorial.
Download the Source Files for this Tutorial
To make these files accessible to everyone, they are offered on a “Pay What You’re Able” basis with no minimum (enter $0 if you’d like) or maximum (your support helps keep the content coming – similar real estate training exercises sell for $100 – $300+). Just enter a price together with an email address to send the download link to, and then click ‘Continue’. If you have any questions about our “Pay What You’re Able” program or why we offer our models on this basis, please reach out to either Mike or Spencer.
Frequently Asked Questions about Creating Dynamic, In-Cell Buttons and Toggles in Excel
Version Notes
v1.1
- Misc. formatting enhancements and cleanups
- Added version notes tab
v1.0
- Initial release


